SKILL Modules Admin Help Center
Please view the table of contents to the right to navigate around the Help Center.
Platform Training
Integration Help
LTI Set Up
Common Issues in LTI Integration
If you try to integrate an LTI link into your Learning Management System and it does not work, there are some common settings to check, as well as LMS-specific issues.
Common Settings to Check 1) Key and secret: If you are unsure, contact Credo support. 2) Launch domain: It should look like [yourschool] . credocourseware . com 3) Grading Settings: Do you need to check a box that allows the tool to send grades to the gradebook? 4) Privacy Settings: The privacy settings of the LTI tool should be set to gather the student email and student name, at minimum. 5) Security Settings: If your institutional firewall requires you to access outside websites via SSH, you may need to tick a box that forces the tool via SSH.
Blackboard-Specific Settings New Line in Description Field: There is a known issue in Blackboard where the use of a new line (pressing the Enter key) in the description field of a content item will break the LTI connection. When creating your LTI links, please use single paragraph text only in the description field, with no new lines, and minimal formatting.
Multiple Quizzes in a Single LTI Link: If you combine multiple quizzes within a single LTI link, Blackboard will aggregate the quizzes and return a total score in a single gradebook column.
Desire2Learn Disassociate the Gradebook Before Deleting: Before deleting a module, it must first be disassociated with the gradebook. If the gradebook column was still associated with the module upon deletion, the gradebook column will no longer be capable of deletion itself.
Blackboard LTI Integration
There are two steps to integrating Credo courseware with Blackboard using LTI. The first step is a one-time process that sets Credo up as an LTI "Tool Provider". This step only needs to be done once and is a global setting. The second step needs to be done each time you want to integrate a Credo lesson, chapter, or quiz.
Part 1: Adding Credo as an LTI Tool Provider
Note: You will need to have administrator access to your Blackboard for this part. If you do not, you will need to ask your Blackboard Admin to complete this part. For LTI integration, your Blackboard instance will need to be release 9.1 or later.
Step 1: Click on the Settings tab in the administrator panel. Then under "Building blocks" section, click on the "building blocks" link, then click on LTI Tool Providers."

Step 2: Under "LTI Tool Providers" click on "Manage Global Properties." Ensure that you set the settings as following:
- Enabled in courses: Yes
- Enabled in organizations: Yes
- Creation of tool provider links: Allow links to any tool provider that isn't explicitly excluded.
- Allow configured tool providers to post grades: Yes (this is important if you want the credo grades to automatically integrate with your Blackboard gradebook)

Step 3: Under the "Default Configuration" section, here are the recommended settings:
- Send User Data: Send user data only over SSL
- User fields to send: Role in course, name, email address (optional)
- Send context identifiers as: Primary key (this ensures student privacy and compliance with FERPA)
- Show user acknowledgement message: No
- Click submit when you are done.

Step 4: Click on the "Register Provider domain" button. Under the Provider Domain Status section, fill in the fields as follows:
- Provider domain: this is your courseware domain (e.g. credou.credocourseware.com)
- Provider Domain Status: Approved

Step 5: Under the Default configuration section, fill in the fields as follows:
- Default configuration: Set globally
- Tool provider key: this is given to you at your Credo on boarding. If you have lost it, please contact Credo support.
- Tool provider secret: This is given to you at your Credo on boarding. If you have lost it please contact Credo support.

Part 2: Adding a Weblink to a Course
To add a chapter or quiz to your Blackboard, it is a simple process.
Step 1: Under "Course Content", click on "Build Content" and select "Web link"

Step 2: Fill in the following settings:
- Name: Enter a name for your chapter or quiz
- URL: This URL is given to you by Credo. If you have lost your URLs, please contact Credo support.
- Be sure to check the box next to "This link is to a Tool Provider".
- If it is a quiz, you must check "yes" for enable evaluation.
- Set the point value for the quiz - our pre and post tests have 25 points and the quizzes are 5 points.
- You may also set an optional student visibility and due date.

Canvas LTI Integration
There are two parts to LTI integration with Canvas - the first part only needs to be done once as a global setting. You will need Administrator access to your Canvas; if you do not, please ask your Canvas Admin.
Part 1 - Set Credo up as an "External Tool" in your managed account.
Step 1: Click on managed accounts and select your organizational account. Then click on "settings" at the bottom of the left-hand navigation menu.


Step 2: Click on the "Apps" tab, then click on "Add New App"

Step 3: Fill in the following fields:
- Name: Whatever is easy for you to remember
- Consumer Key: (given to you by Credo)
- Shared Secret: (given to you by Credo)
- Domain: The domain is your courseware homepage (e.g. CredoU.credocourseware.com)
- Privacy (set to "public")
- URL: The URL (or Launch URL) can remain blank, as this will be added in the course set up.
If you have forgotten your key and secret, please contact Credo support to get them again.

Part 2 - Add the external tool as an assignment in your course.
Step 1: Click "Add assignment" and then "more options."

Step 2: Under "submission type," click on "external tool."

Step 3: Paste your LTI link into the text box, and decide whether you want the tool to open in a new tab.
Optional: Adding the assignment to a module
Optional Step 1: Go to Modules in the left-hand navigation
Optional Step 2: In the header bar of the module in which you would like to add the assignment, click on the settings gear icon, then click "add content."

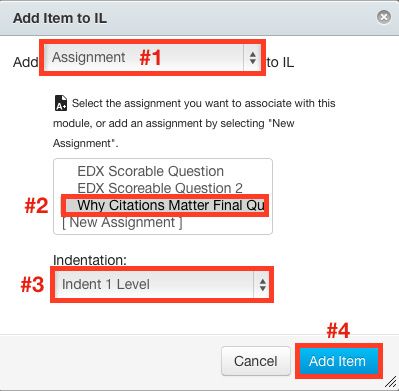
Optional Step 3: In the Add Item popup, for the "Add" dropdown, select "assignment." then select the item you created earlier (you may need to scroll down the list to locate it), select the indentation level you desire, then click "Add Item."
Moodle LTI Integration
There are two parts to Moodle integration: The first is a global tool set up and the second is adding the LTI links to a course.
Part 1 - Global Tool Set Up
Step 1: Sign in as an instructor and under the "Administration" panel, click on "turn editing on."

Step 2: Under the settings menu, select the following: Site Administration --> Plugins --> Activity Modules --> LTI

Step 3: Click on "Add external tool configuration."

Step 4: Fill in the information you got from Credo about your LTI integration. Tool Name: Credo InfoLit Modules (or something similar) Tool Base URL: This is the Launch or Domain URL of your course website. Consumer Key: Sent from Credo Shared Secret: Sent from Credo * Privacy: Set share launcher's email with tool to "always" and accept grades from tool to "always".

Part 2 - Adding Your Links to a Course
Step 1: Sign into Moodle as an instructor and under the "Administration" panel, click "turn editing on."
Step 2: Click on the "Add an Activity" dropdown menu within the week you want to add the item. From the dropdown, select "External Tool".

Step 3: Under the External Tool Type, look at the drop down menu for "Automatic, based on luanch URL". If it doesn't fit any existing settings, click on the plus icon to the right of the drop down menu to add the LTI settings for the Credo tool.

Step 4: Fill in the information you got from Credo about your LTI integration. Please note: You do not need to do this if the Automatic tool has already found them for you. Tool Name: Credo Tool Base URL: This is the Launch or Domain URL from your Credo integration document. Consumer Key: Found on your integration document. Shared Secret: Found on your integration document. * Privacy: Set share launcher's email with tool to "Always", and accept grades from tool to "always".
