InfoLit Modules Students Help Center
Troubleshooting Tips
If you are having trouble viewing the Credo courseware in your browser you may want to follow these simple troubleshooting steps to help diagnose the problem. If you're still having trouble once you've gone through these steps, please contact Credo support.
Step 1: Try another browser (such as Chrome or Firefox). Are you having the trouble on the different browser or is it browser-specific?
Step 2: Did you click the correct enrollment link?
Step 3: Try adding the course link (https://xxxxx.credocourseware.com) to your browser trusted sites list. Directions on how to add a site to your trusted sites list can be found here.
Step 4: In your browser's settings, please make sure that it is not blocking first party and third party cookies. This security setting could prevent use of all or parts of the course depending on which cookies are being blocked.
Step 5: Are you accessing the courseware via a government or military internet connection? If this is the case, you may need to ask your IT department to whitelist a number of URLs. In this case, please contact Credo support for a list of URLs to whitelist.
How to Complete a Self-Graded Question
Self-graded questions may seem like a strange thing to see in an online course, but the act of reflecting upon your questions and comparing them to a set rubric will help you to learn and increase your knowledge while you are still grading your answer.
Step 1: To complete a self-graded assessment on the Credo platform, it is important to understand the assessment instructions. Before each assessment, there will be a page just for the assessment instructions. Pay close attention as this page will tell you what the assessments will be looking for and asking you to grade yourself on.

Step 2: On the question, you will see the pre-written question prompt. The prompt will tell you what you should write or what questions to answer in your response. You can write your response in the text box below the prompt. You may save your answer and come back to it at a later time, but you must click the blue "Submit your response" button for it to be recorded.

Step 3: Once you submit your answer, you will be presented with a grading rubric. Look at each of the point values and what each one expects to see in your response. Select the most relevant one for your response, then click the blue "Submit your assessment" button.


Step 4: You will know your score has been recorded when you see the green "Complete" checkmark at the top of the assessment question. You can click on the link to review your grade if you forgot what you scored. At this time, you can now continue on to the next question or lesson.

No Courses Showing on Dashboard
If you login to your dashboard but do not see any courses, it may be due to oneo f the following reasons:
Already Registered: If you've already registered and are not seeing any courses in your My Courses list, go to your institution homepage link and then log in to access the course. your institution homepage will be in the following format: https://collegename.credocourseware.com/
Not Registered: If you have not yet registered for the course, use the course enrollment link if you have one. Complete the following steps to enroll:
- Click on the enrollment link.
- Select “Enroll in Course.""
- Complete the registration form by providing your e-mail, full name, public username, and password. Tick the Terms of Service box.
- Once you have completed the form you will see a screen that says you are not enrolled in any courses. Check your email at this point as you will receive an email from Credo containing an activation link.
- Click the activation link. Your course will appear in your My Courses list after you click this link.
No Registration Link: If you do not have a enrollment link and still don't see any courses, it is possible that your course has not started yet and is hidden, or that your instructor needs to manually enroll you. In this case, you will need to get in touch with your instructor.
Creating an account
Manually Creating an Account
Creating an account in the Credo courseware is a quick and simple process. Before starting this tutorial, your instructor should have given you an enrollment link.
Step 1: Click on the enrollment link, verify that it is the course you want, then click on the "Enroll" button.

Step 2: You will be prompted to create your own account. Only the fields noted with an asterisk are required.

Step 3: You will then see a "Thanks for registering" message informing you that you received an activation email and will need to activate your account. You can then click on "View Course" to see the courseware, but be sure to check your email and click on the activation link before you start the course!

Step 4: You will automatically receive an activation email when you register. The email looks like this and you just need to click the activation link to have your account fully set up.

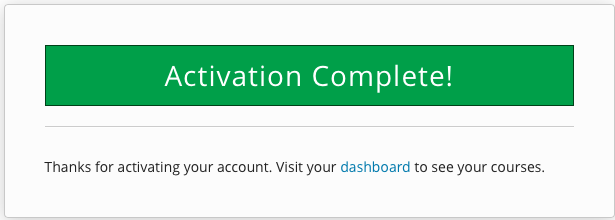
Step 5: Once you activate your account, you will see a green confirmation message. From then on out, you can always go straight to the main Credo courseware dashboard and just log in with this account for any course on the Credo courseware platform.
Login With Your University Account
If your institution has set it up, you can login to your Credo course using your University account. To do so, follow these steps:
Step 1: From the Credo courseware dashboard, click on "Sign In."

Step 2: On the "Sign In" page, scroll down and click on "Use my institution/campus credentials."

Step 3: Select your institution name from the list.

Step 4: Locate your institution name from the dropdown menu and click "Go".

Step 5: Sign in using your University account, then click "Log In."
